9. LIMS
The Lab module of Ezovion Hospital Management Software starts from collection of sample data till the result of the particular test of a patient. The Lab module is split into two sections.
- Lab Order Queue
- Lab Order List
1. Lab Order Queue:
In the dashboard on the top section, the number of new orders, the number of waiting-for-result orders, the number of checked-out the orders and the total number of orders for today will be shown. The refresh button is used to refresh the count present as a notification in each of the lists. The order queue consists of the following processes,
- New List
- Sample Collected List
- Pending Entries
- Waiting for Approval
- Approved List
- New List-
- The new list in the order queue contains the new orders which are prescribed for the day. The orders from IP, OP and EHR Case Sheet-Investigation will be loaded here. The details of the order shown are Bill ID, Physician, Date, Order from, gender/age, name and edit.
- Click on the Edit icon under Action. Clicking directs to the “Edit Lab work Order” page.
- After collecting the sample from the patient for the prescribed test, click on the “Sample collected” check box.
- After the sample collection date, the barcode and sample no will be updated.
- Click on the “Update” button, on clicking the status of the order will be changed to “Sample Collected” and the particular order will move from the New List to the “Sample Collected List” tab.
9.1.1 – Lab- Order Queue- New List

9.1.2 – Lab- Order Queue- New List- Edit Lab Work Order

- Sample Collected List-
- From the sample collected list, the orders can be edited, and acknowledged and result entry can be done.
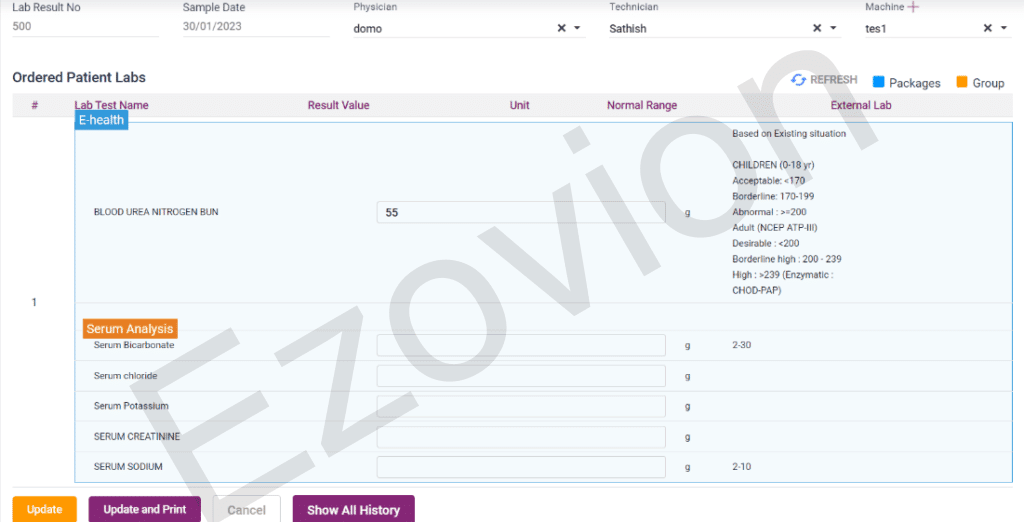
- On clicking the “Add” icon under Action, it directs to the “Lab Result Entry” page. In this page, the result of the lab tests can be entered
- The lab result no, sample date, physician name, and machine will be automatically loaded. The user must select the Technician.
- On clicking “Save” button, the lab order will move to the “Waiting for Approval” tab.
- On clicking edit it displays the “Edit Work Order” page.
- In that page the user can select the “Received” check box if the work order has been from the outside lab and received. After that select the “Update” button.
- Click on the “Acknowledge” button in the sample collected list options.
- On clicking the Acknowledge button it directs to the “Edit Work List” page.
- In that page, select the “Acknowledge” check box and click on “Update” button.
- Once updated, the acknowledged order will be moved to the “Pending Entries” list.
9.1.3 Sample collection page

9.1.4 Sample Collected List
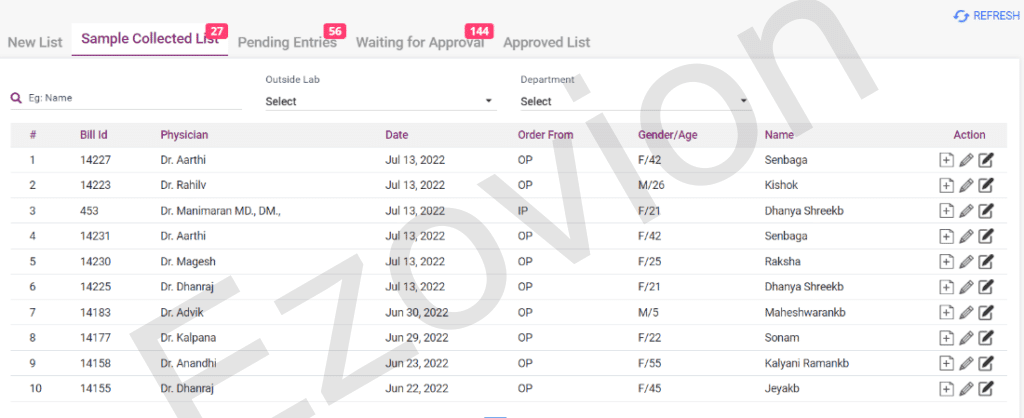
9.1.5 Sample collected list – Acknowledge page

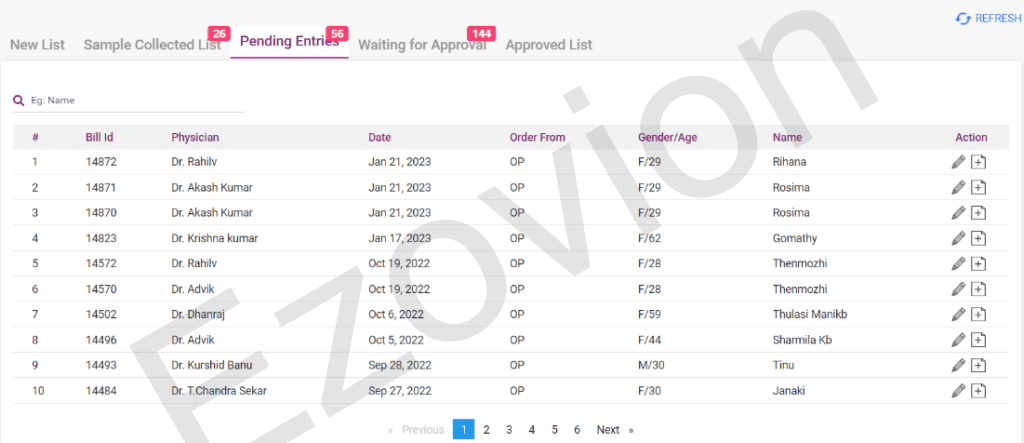
3. PENDING ENTRIES LIST
- From the pending entries list, the user can either edit the order or enter the result by clicking the “Add” icon which directs to the “Lab Result Entry” page.
9.1.6 Result Entry Page
9.1.7 Pending Entries List
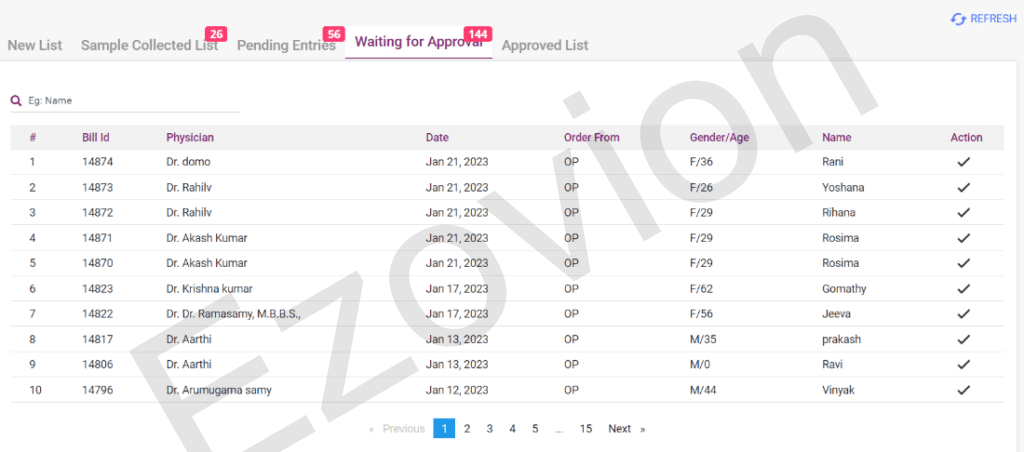
4. WAITING FOR APPROVAL LIST
- From the Waiting for Approval List, the order can be approved.
- Click on the “Tick” icon under Actions. On clicking the icon, it directs to the “Lab Result Approval” page.
- In the lab result approval page, all the fields will be automatically loaded. The user must select any one of the following radio buttons. “Approved”, “Partial” and “Rejected”.
- On selecting approval or partial, the order will be moved to the “Approved List”.
- On selecting rejected, the order will stay in the waiting for approval list.
9.1.8 Waiting for approval List
9.1.9 Lab Result Approval page

5. APPROVED LIST
- Only the lab orders which are approved will be displayed in this list.
- The user can take a print of the particular lab order from this page.
9.1.10 Approved List

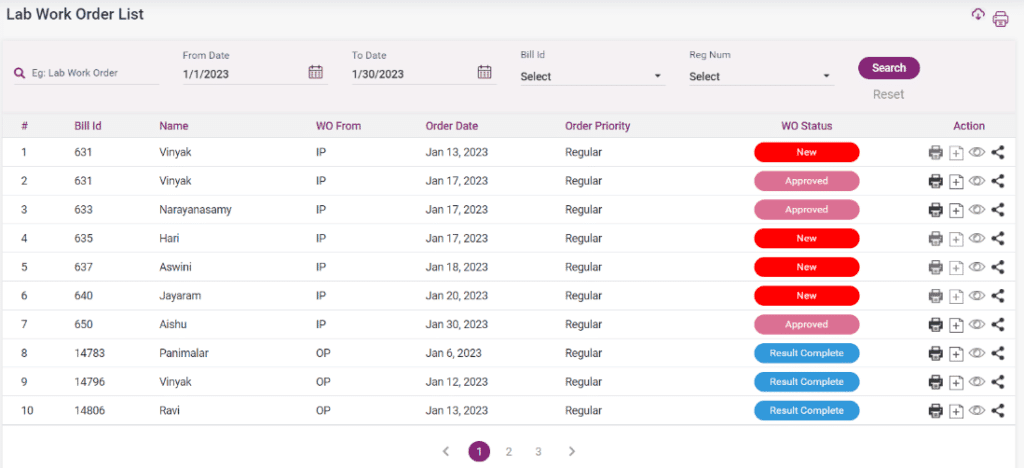
- LAB ORDER LIST
- The lab order list consists of all the lab orders irrespective of the WO Status.
- The lab orders can be searched by name search, From date and to date, bill number and registration number.
- The different WO statuses are, “New”, “Sample Collected”, “Acknowledged”, “Result Complete”, “Completed” and “Approved”.
- The new lab orders can only be shared.
- The sample collected lab orders can be directed to the result entry page by clicking the “Add” icon. They can also be shared.
- The Acknowledged work orders can be viewed and shared.
- The result complete work orders can be printed, viewed, shared and directed to the result entry page.
- The approved and completed orders can be printed, viewed and shared through mail or message from here.
9.2.1 Lab Order List
10. RADIOLOGY
Ezovion radiology module is a networked system for managing medical imagery and associated data. It is especially useful for tracking radiology imaging orders and billing information and is often used to manage image archives, record-keeping, and billing. Before starting here, the user must go to Admin->user management-> edit user->Page access-> select the modalities (service sub-category master) which must be accessible for the user for eg., “CT”, “MRI”, “Xray”.
According to the selected modalities, the Radiology dashboard displays the modalities.
The Radiology module is split into two sections.
- Radiology Dashboard
- Radiology Order List
Screenshots:
10. 1. User management – Page Access
1) Radiology Dashboard:
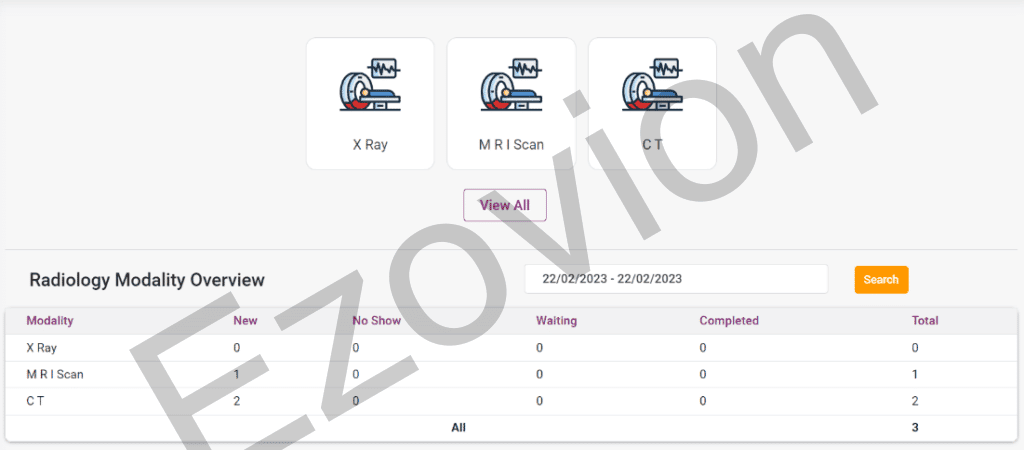
The Radiology Modality Overview section shows the list of Modalities and the count of the radiology order according to “New”, “No Show”, “Waiting”, “Completed” and the Total count.
In the top section, the list of modalities selected will be displayed. If we want to see only the list of work orders related to the particular modality, click on that modality. On clicking it will direct you to the radiology order queue page. The dashboard at the top will show the radiology orders, the number of waiting-for-result radiology orders, the number of checked-out radiology orders, and the total number of radiology orders for today. You can change the modality from the modality drop-down list. After changing, click on the edit icon of the patient to view only the work orders of that modality in the patient’s work order list.
If the user wants to view all the work order then they must click on the “View All” button from the radiology dashboard. The radiology order queue consists of the following processes,
- New List/No show list
- Waiting List
- Completed list
1. New List/ No show list:
The radiology order queue’s new list contains the radiology orders prescribed for the day, originating from IP, OP, EHR Case Sheet – Investigation, and OT daycare. The displayed radiology order details include the Bill ID, Name, and an edit option. The status of the bill and patient type (IP or OP) along with physician details will also be shown.
This queue has two types of work orders: those sent to outside labs and those processed within the hospital labs.
Initially, the radiology orders in the new list will have a status set as “New.”
Screenshots:
10.2. Radiology Modality Overview
10.2. Radiology – New List

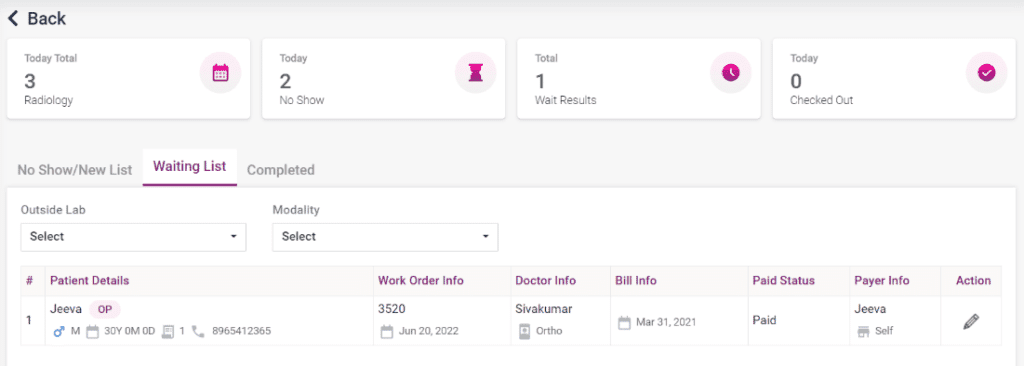
- Waiting List:
Sending Orders to an Outside Lab:
- Access the new list and click on the edit option for the specific order.
- Select the send check box and click the “Update” button.
- The system will set the work order status to “Waiting,” and it will be moved to the waiting list.
Receiving Results from the Outside Lab:
- Go to the waiting list and click on the edit option for the work order.
- Select the received check box, add the scan result in the attachment option, and click on update.
- The system will change the status of the work order to “Complete,” and it will be moved to the Completed list.
Sending Radiology Work Orders to the In-House Radiology Department:
- Click on the edit option for the specific work order.
- Add the result scan in the attachments option and click on update.
- The system will set the status as “Completed,” and it will be moved to the completed list.
10.3. Radiology – Waiting List
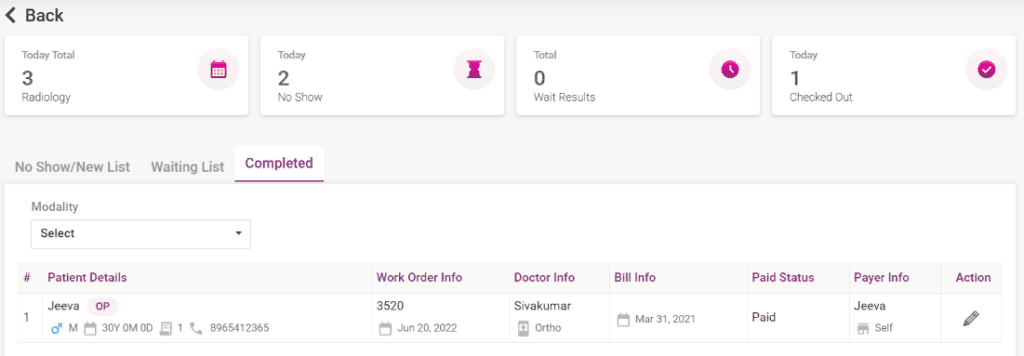
- Completed List:
- The radiology work orders which are completed will be shown in this list.
- They can be edited, and new scan reports can be added in the attachments section and updated.
10.4. Radiology – Completed List


