8. ACCOUNTS #
Accounting Module comprehensively manages patients accounts; claims, receivables, path claims, resubmit and challenge of claims the module further manages postings, collections, expenses, clinician’s payments/expenses, transactions, bank, cash and closing balances. Summary of payments and collections for providers and clinicians is available with reports and charts. Documents related to accounts are archived; receipts, bills, checks, or any document related to accounts. Reports are generated for keeping track of all functional accounting procedures. Ezovion Hospital Management System Accounts module consists of the following,
- Payment List
- Doctor Revenue
- Patient Referral
- Cancelled Bill List
- Credit Bill- Self
- Receipt List- Self
- Bank Transaction
- Cancel Advance List
- Daybook
- Other Income List
1. Payment List #
- To add a payment entry, click on the “Add Payment Entry” button which directs to the “Add Payment” entry page. And enter the following details,
- Payment date: Current date will be displayed; user can change the date if needed.
- Expense Type: Select the type of expense whether refund or expense.
- Click on save button to save the entry. The payment will be loaded in the Payment list page.
- The user can edit the entered details using the edit option.
- All the payment which has been refunded or returned for any reason those entries will also be loaded in this list.
8.1.1. Payment List #

- Doctor Revenue Share List
- The doctors share revenue for any consultation of services used for the patient. Those revenue shared list will be shown here.
- The list can be searched using the search criteria which includes physician name, from date and to date, status and Inpatient or Outpatient.
- The list can be selected to change the status into “Approved” or “Pending Review”.
- On selecting the status, fill in the approver, approver date and notes and click on “Save” button.
8.2.1 Doctor Revenue List #

- Patient Referral
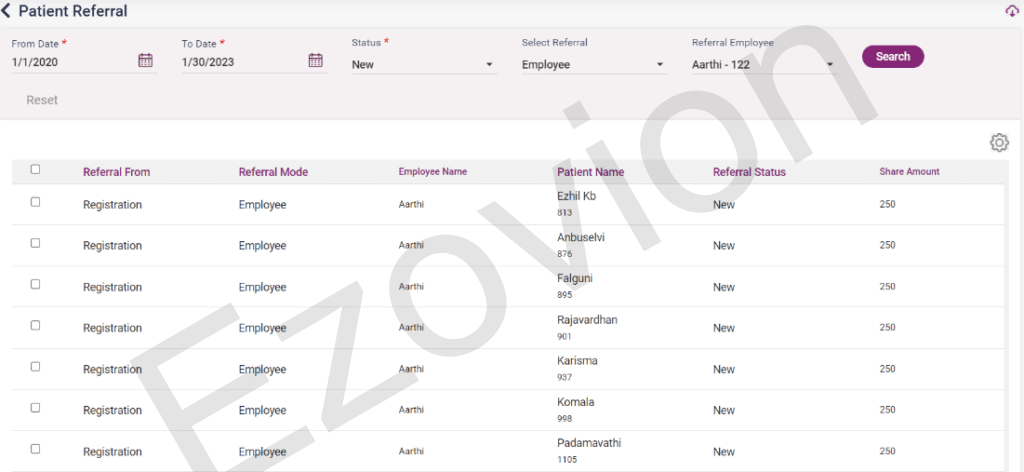
- The patients who have any referral from any of the employees or physicians available in the hospital.
- The user can search in the list by using the from date and to date, status, status, referral type and referral name.
- The searched list can be selected to change the status into “Approved” or “Pending Review”.
- On selecting the status, fill in the approver, approver date and notes and click on “Save” button.
8.3.1 – Patient Referral #
- Cancelled Bill List
- Any bills which have been cancelled in the Inpatient and Outpatient sections will be displayed here.
- The bills can be searched using the from date and to date, refund status, name, Outpatient, or Inpatient.
- The cancelled bill initially will be set to Refund status as “No”
- Click on the “Payment” icon and enter the details on the payment entry page. Select the expense type, ledger name, payment receiver type and payment type. Other details will be automatically loaded.
- Click on the Update button, the entered details will be saved and the refund status will be set to “Yes”. The entry will also be displayed in the payment list page.
8.4.1 – Cancelled bill list #

- Credit Bill – Self
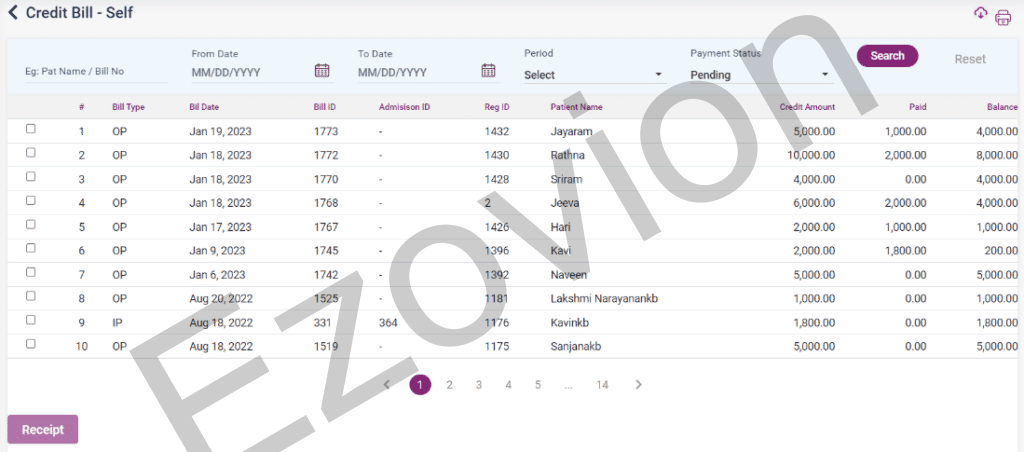
- Any bill in IP and OP which have been selected as credit bill will be sent to this section.
- The list will be displayed showing the bill type, bill date, bill ID, Admission number, Reg ID, patient name, credit amount, paid amount, and balance amount.
- The list can be searched by name, from date to date or period and payment status.
- If the credit bill is ready for payment, select the bill and click on “Receipt” button.
- It directs to the “Self-Receipt” page. The amount and patient details will be loaded.
- Select the payment type, reference number, amount and click on the save button.
- If only few bills are to be paid, then the other bills can be deleted using the delete option.
- Once paid, the payment entry will be moved to the Receipt list section in the account’s module.
8.5.1 – Credit bill list #
6. Receipt List- Self #
- The receipt list page consists of the credit bills which have been paid by the patient.
- The bills can be searched using the from and to date or patient name.
- The bills can be viewed or taken print by using the available icons.
8.6.1 Receipt bill list

- Bank Transaction
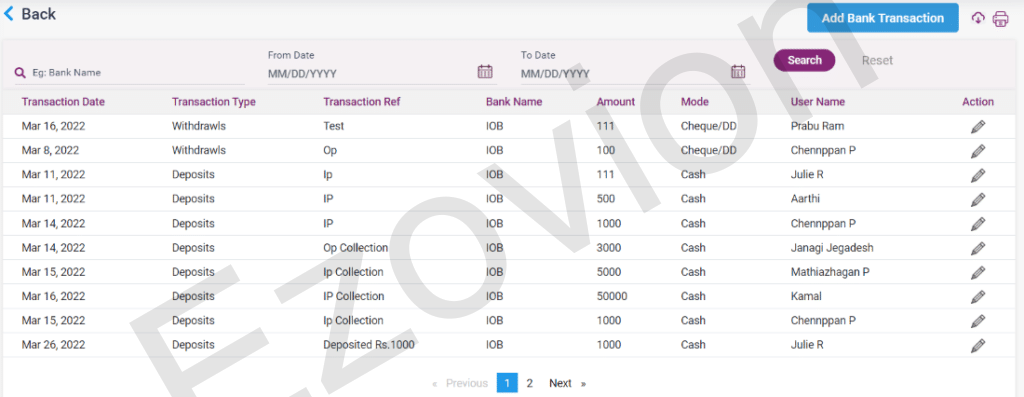
- If there is any particular transaction done in the account that the hospital is linked to then it can be entered from this page.
- Click on the “Add Bank Transaction” button which directs to the add bank transaction page.
- Select the transaction type, bank name, done by, date, mode, enter the amount, reference number, reference notes and reference notes.
- Click on “Save” to save the entry, cancel to cancel the entry, and go back to the previous page, click on clear to delete the entered details.
- The added bank transaction entry will be displayed in the bank transaction screen. Click on edit to edit the details.
8.7.1 – Bank Transaction List #
8.7.2. – Add Bank Transaction #

8. Cancel Advance List #
- If the advance which is paid for a particular Inpatient has to be returned or cancelled, it will be shown here.
- To cancel an advance, go to the “Advance List”, and click on edit. In that page click edit in the advance you want to cancel. On clicking edit the “Edit Advance Receipt” screen will be displayed.
- Select the “Cancel Advance” check box and select the “Cancel Bill” button. Upon clicking the entry will be shown in the cancel advance list page with the payment status as “No”.
- Click on the payment icon of the entry, enter the payment details, and select the “Save” button to save the entry. After that, the refund status will be set to “Yes”.
- Once the amount is refunded and updated, this entry will also be added to the Payment List page.
8.8.1. Cancel Advance List
9. Daybook #
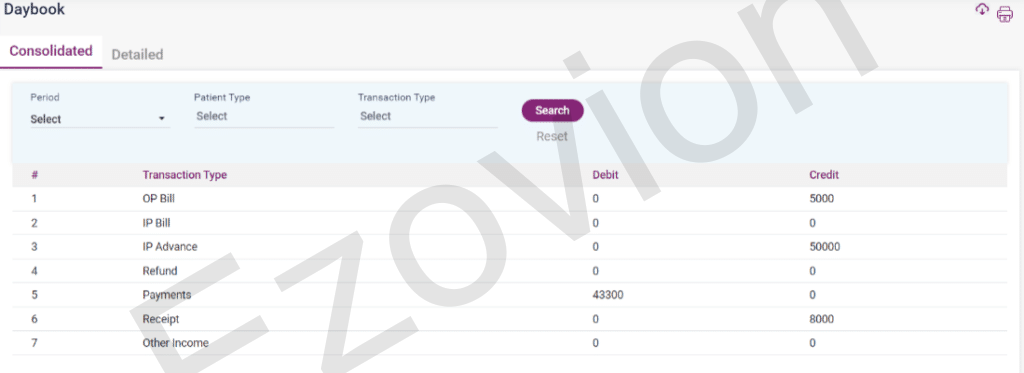
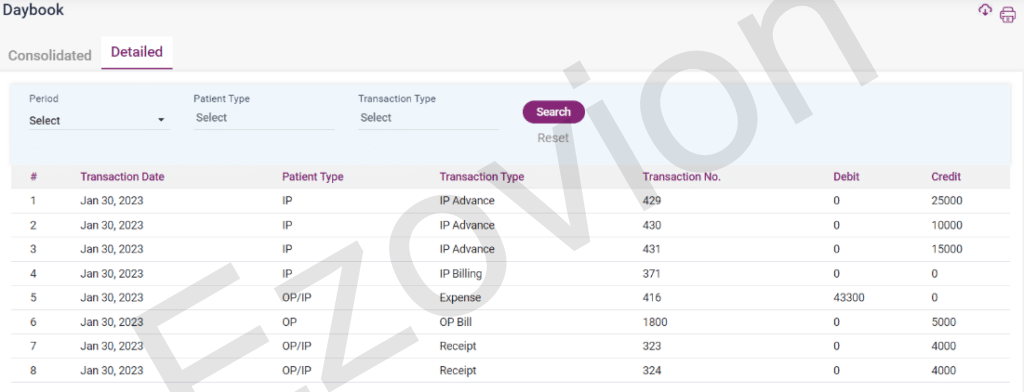
- The daybook consists of the consolidated and detailed list of debit and credit which is done inside the system.
- Select the search criteria by period, patient type, and transaction type.
- The consolidated search results will be displayed which includes transaction type, debit amount and credit amount.
- The detailed search results displayed are transaction date, patient type, transaction type, transaction number, debit amount and credit amount.
8.9.1 Daybook – Consolidated #
8.9.2 Accounts Daybook – Detailed #
10. Other Income List #
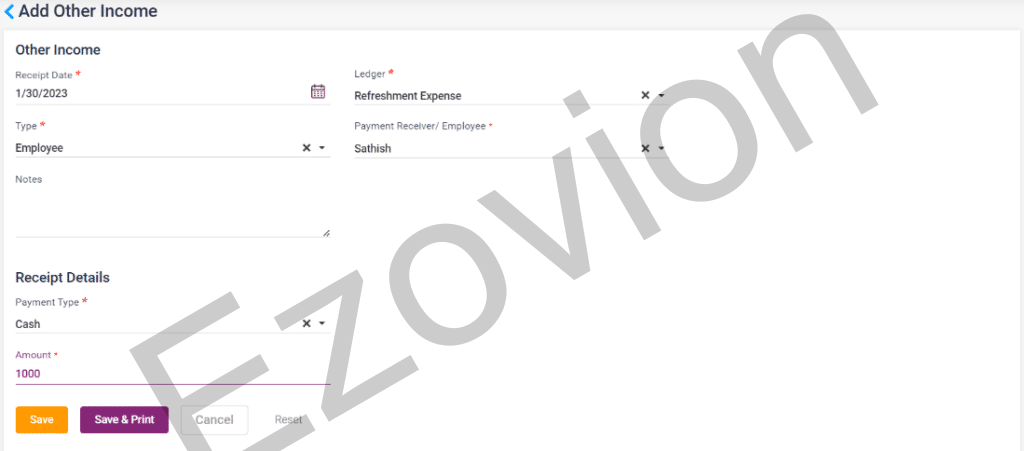
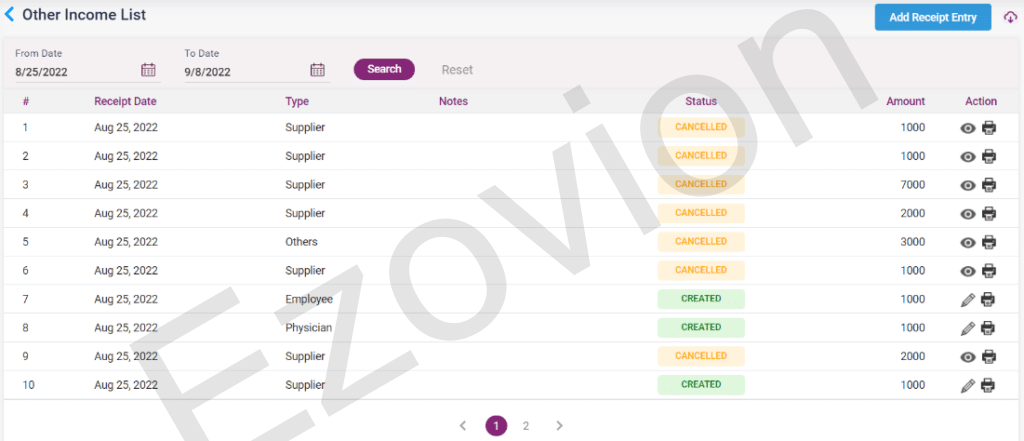
- This page consists of the income for the hospital by any other means. It can be entered manually by clicking on the “Add Receipt Entry” button.
- Select the ledger, type, and enter the notes, Payment type and amount. After entering the details select the “Save” button
- Once save then the entry will be displayed on the Other Income list page with the status set as “Created”.
- If the user needs to cancel the income, then the user can click on edit, click on the “Enable to Edit” button, select the Cancel Income checkbox, enter the cancel reason and click on the update button.
- Once updated the entry will be displayed on the Other Income List page with the status set as “Cancelled”.
- The bills can be searched using the from date and to date.
8.10.1 Other Income List #
8.10.2 – Other Income List- Receipt Entry #


