11. PHARMACY
Hospital pharmacy is the health care service, which comprises the art, practice, and profession of choosing, preparing, storing, compounding, and dispensing medicines and medical devices, advising patients, doctors, nurses and other healthcare professionals on their safe, effective and efficient use. Ezovion provides pharmacy module in such a way that this system that records, oversees, and stores patient related information. This information is then utilized for tracking of patients, decision making, re-ordering, reporting, billing, workflow management and quality assurance.
Ezovion Pharmacy Workflow:
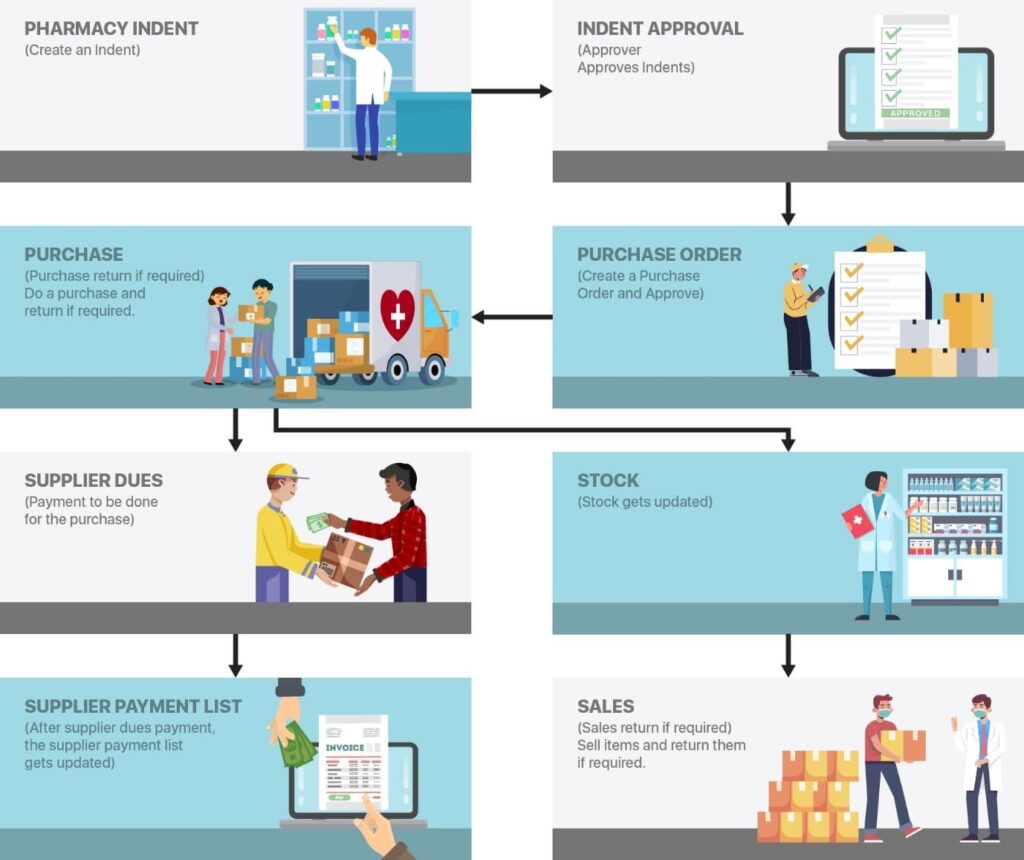
It consists of the following sections,
- Indent
- Purchase
- Sales
- Stock
- Accounts
1. Indent
Indent creation is the first step of tendering process. By the indent, department analyzes the need of services/goods and cost estimation. Department user who has the privilege to create new indent can create indent(s) and send it to authorize person in department for approval. It has the following steps to be done.
a. Indent Request
b. Indent Approval
c. Indent Issue
d. Indent Receive
- Indent request: An indent is an official order or a requisition for medicine and supplies. The employee acquires the equipment and supplies based on the need, estimation availability and budget. The request can be done from inter branches of the hospital and inter departments inside the hospital.
- Click on the “Indent Request” button to direct to the “Add Indent Request” page.
- The “Indent No”, “Indent Date”, “Tenant” and “Requester Branch” will be automatically loaded.
- Select the “Requested By” name from the list and select the “Sender Branch”.
- Product Name/Generic Name: In the “Add Medicine” section, select the medicine or product from the “Search Medicine” field.
- Add: Click on the add button to add the entered medicine in a list below.
- Save: On clicking the save button the request will be saved and the status of the request will be set as “New”. The user can edit and make changes to the request and update.
- Send Request: On clicking send request button, the requested medicine will be sent for approval and the status of the request will be changed to “Waiting for approval”.
- The requested list will be displayed in the “Indent Request” screen.
11.1. Pharmacy- Indent- Indent Request-Add Indent Request
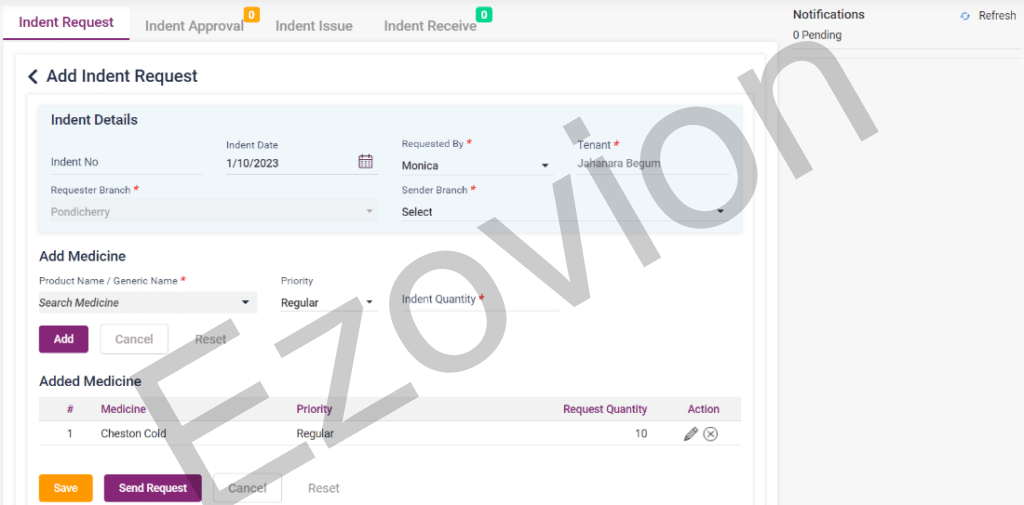
11.2. Pharmacy- Indent- Indent Request

b. Indent Approval: The approval of the indent requested will be done from the side who is going to send the products which are requested. The employees who receive the request approve it according to the availability and timing. The approval will be done from the sender branch or sender department.
- In the notifications panel on the right side, the current request will be shown with a “Go to Approve” button. Click on the button to go to the Approval page or select the edit icon of the Indent request.
- The “Edit Indent Approval” page will be loaded. The page will automatically be loaded with the available indent details.
- The approver must enter the quantity according to the availability and click on the “Update” button to Approve the Indent.
- Once Approved the status of the Indent will be changed to “Approved” and the “Go to Issue” icon will be enabled.
11.3. Pharmacy- Indent- Indent Approval-Edit page (waiting for approval)
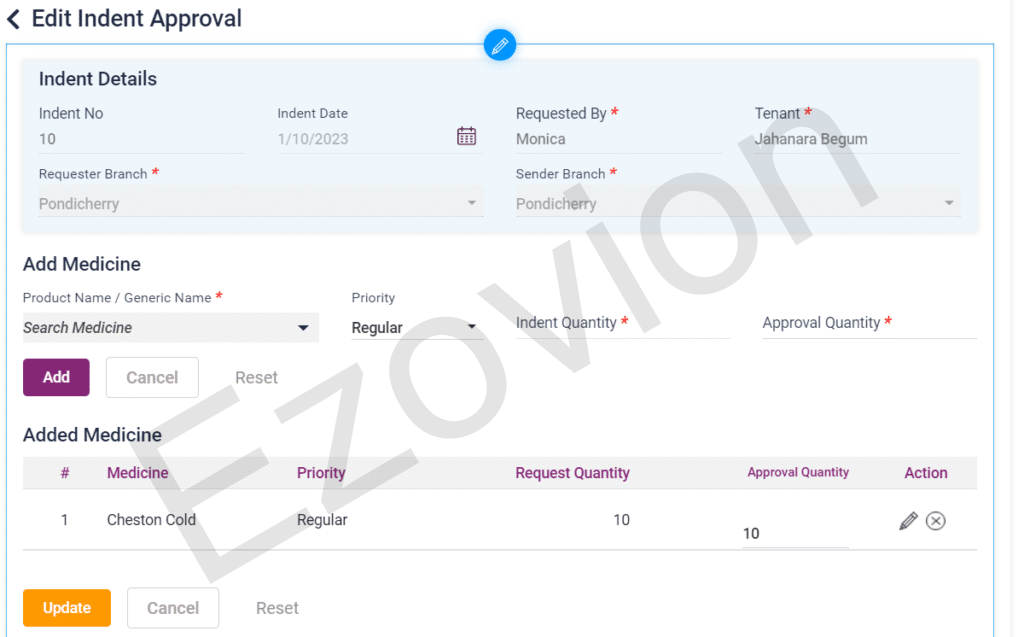
11.4. Pharmacy- Indent- Indent Approval
c. Indent Issue: The indent issue will be done from the sender side. The product or medicine will be issued from the stock and send to the requestor.
- Click on the “Go to Issue” icon, the “Add Indent Issue” page will be loaded.
- In this page the issuer will enter the issued quantity according to the stock available.
- After entering the “Issued By” name from the drop-down list click on the “Save” button to complete the Indent Issue.
11.5. Pharmacy- Indent- Indent Issue -Edit Issue
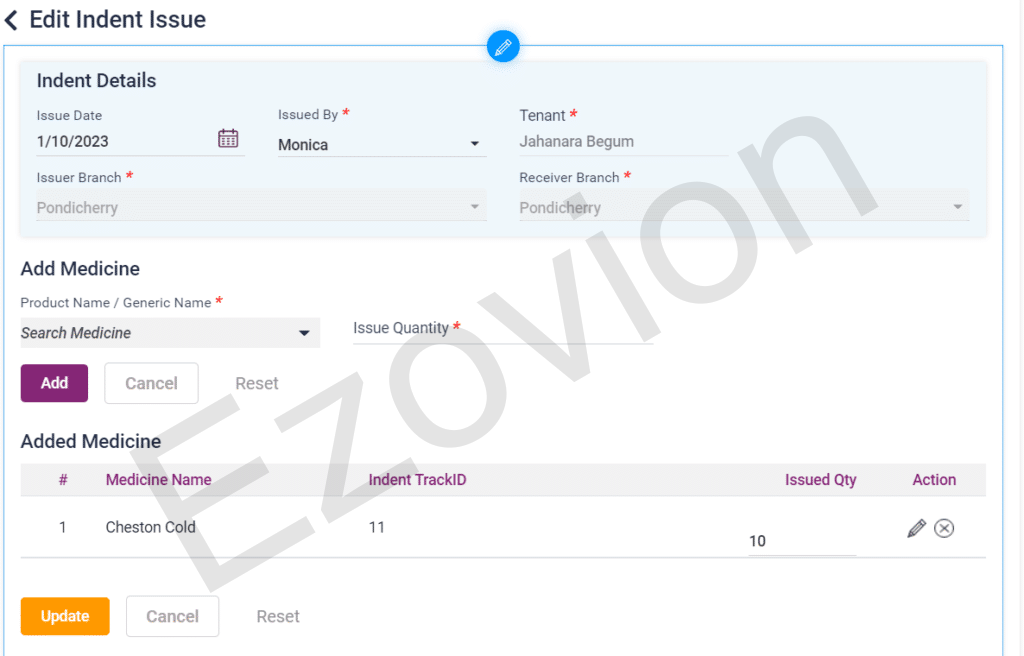
11.6. Pharmacy- Indent- Indent Issue

d. Indent Receive: The indent requested, after issued must be received from the requestor side. After receiving the product or medicine will be decreased in the stock list.
- Click on the “Go to Receive” icon available in the notifications panel.
- Enter the quantity of the product received in the Received quantity field.
- Other details will be automatically loaded. Select the “Received by” name from the list and click on save to complete the Indent process.
11.7. Pharmacy-Indent- Indent Receive-Add Indent Receive

11.8. Pharmacy-Indent- Indent Receive

2. PURCHASE
Pharmacy purchase is defined as a process of acquiring supplies through purchases from the manufacturers, their agents like distributors or from private or public suppliers. Purchasing of medicines starts with the framing of buying policies and ends with receiving, stocking, and payment. The pharmacy purchase section includes
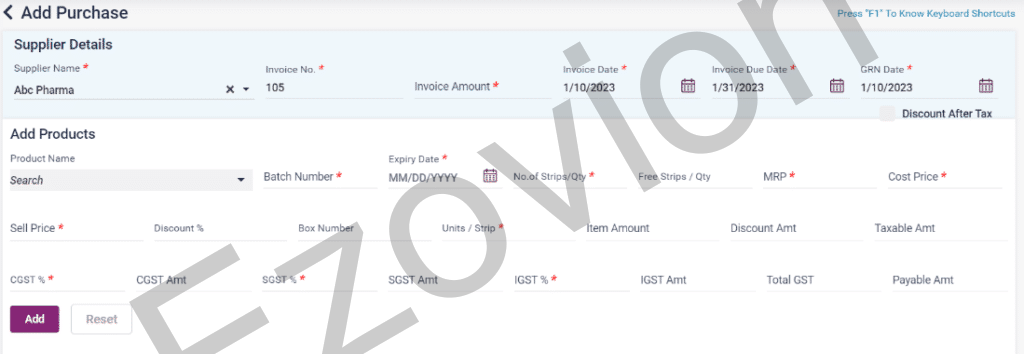
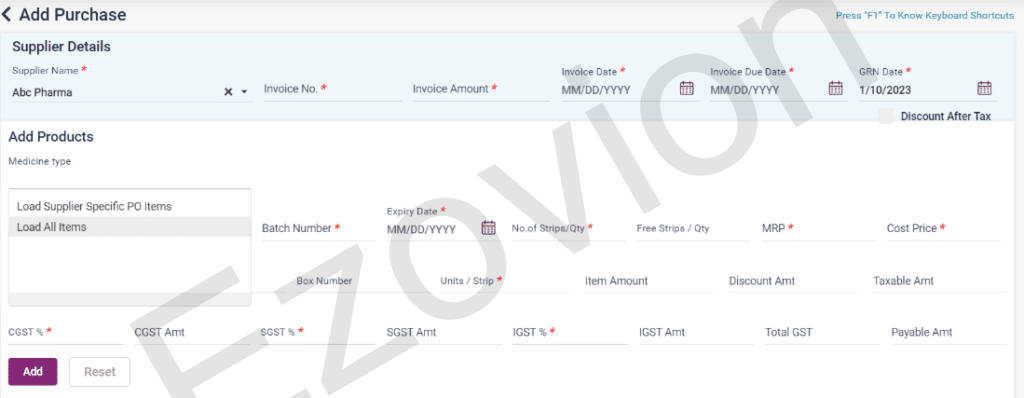
a. Purchase: The purchase of the necessary medicines needed for the hospital can be done in this section. The purchased list can be searched using the from date, To date or Period. The pending purchases will have edit icon to approve the purchase and the approved purchase will have view icon to view the purchase. Click on the “Add Purchase” button to go to the “Add Purchase” screen. Enter the following details using the invoice available.
- After entering all the mandatory fields, click on “Add” button to add the medicine to the list. The added medicines will be displayed in a list below. Click on Reset button to delete the entered details of the medicine.
- Click on “Save” button to save the purchase. This will be listed in the Pharmacy Purchase page screen. GRN Status will be displayed as “Pending” if the Invoice amount and net amount are not same.
- If the net amount and Invoice amount match, on clicking save the purchase approval pop up box appears. The user must click on “Approve” button to approve the purchase and list it in the Pharmacy Purchase screen. GRN Status will be displayed as “Approved”.
- The purchased items will be updated in the “Stock List”.
11.9. Pharmacy purchase- Add Purchase

11.10. Pharmacy purchase- Add Purchase- Added Products

11.11. Pharmacy purchase list screen

b. Purchase Return: If the products purchased are damaged, expired, ordered by mistake or any other reasons then those particular products can be returned to the distributor. The purchased list can be searched using the from- date, To date or Period. The using the following steps,
- The user must select the supplier’s name from the Invoice which must be returned. Select the invoice number to be returned.
- Select the name of the product from the list. Once the product is selected the other fields will be automatically loaded as it was given in the purchase. The user will have to enter only the quantity which must be returned in the Quantity and Free Unit fields accordingly. Click on the add button to add the medicine to the list below.
- Return Remarks *: Remarks for return must be entered.
- Click on save button to save the purchase return details and this will be listed in the “Purchase Return” page with return status as “Pending”.
- After the return process is completed, the user must click on the edit icon of the purchase return entry and click on the “Update” button for the “Purchase Return Approval” pop up box.
- Click on “Approve” button to approve the purchase return. After this the entry will be listed in the “Purchase Return” page with return status as “Approved”.
11.12. Pharmacy Purchase Return- Add Purchase Return Page

11.13. Pharmacy Purchase Return- Add Purchase Return-Added Products

11.14. Pharmacy Purchase Return (list screen)

c. Purchase Order: A purchase order is a document, executed by a purchaser and forwarded to a supplier, that is considered a legal offer to buy products or services. It demonstrates their commitment to pay for specific products and/or services from a seller, and establishes terms for payment. A PO communicates the buyer’s needs to the seller, and establishes their expectations for the transaction. In Ezovion HMS it has two steps,
I) PO Creation:
- The created purchase orders can be searched by using the from date, To date and period.
- To create a purchase order, click on “Add Purchase Order” which directs to the “Add Purchase Order” screen. In that page enter the details.
- Click on the save button to save the purchase order and it will be displayed in the Purchase Order page as a list and the PO Status will be “New”.
- Click on the “Send to Approve” button to save the purchase order and send for approval. The PO Status of the purchase order will be set as “Waiting”.
11.15. Pharmacy Purchase- Purchase Order- Add PO

11.16. Pharmacy Purchase- Purchase Order- Add PO- Added Products

11.17. Pharmacy Purchase- PO creation list screen

ii) PO Approval:
- The PO sent for approval and the approved PO will be displayed in this page.
- Click the edit icon of the PO which is waiting for approval, in the Edit PO screen click on the “Update” button to approve the purchase order.
- After approval the “PO Status” of the purchase order will be changed to “Approved”.
- After the PO is approved the “Go to Purchase” icon will be enabled.
- On clicking the “Go to Purchase” icon it directs to the Add Purchase page.
- Medicine Type: There are two options available in this page. On selecting “Load Supplier Specific PO items”, the items added in the Purchase Order will only be loaded in the “Product Name” drop down list.
- On selecting the “Load All Items” options all the medicine available in the medicine master will be loaded.
- After this selection, the process of add purchase need to be followed.
11.18. Pharmacy Purchase- Purchase Order- Approved PO list screen

11.19. Pharmacy Purchase- Purchase Order- Approved PO- Go to Issue icon- Add purchase Screen
3. SALES
Sales of Pharmaceutical products, which may include medicines, or surgical devices, consumables of any form, machines, and equipment used in surgeries is called Pharmacy Sales. The target audience is doctors of any kind, chemists, and/or purchase in-charge in hospital or pharmacies. The pharmacy sales section includes,
A. Sales
B. Sales Return
C. Sales Dashboard
A. Sales:
The pharmacy sales includes the sales of the prescribed medicines of the doctor, the equipment or things needed for an operation or any other sales. The pharmacy sales list can be searched using the “From date”, “To date” and “Period”. New sales can be added using the “Counter sales” button and do the following steps,
- Patient Name *: In the patient details section enter the Patient name.
- Mobile Number *: Enter the mobile number of the patient.
- Doctor Name *: Select the doctor name the patient has consulted.
- Product Name: Select the medicine/ product name from the list.
- Quantity: Enter the quantity of the medicine to be sold. The available quantity will be shown below the field.
- Net Amount: The net amount will be calculated after entering the mandatory fields.
- Add button: On clicking the add button the medicine with the given details will be added in the list below.
- The count and the total amount will be shown below.
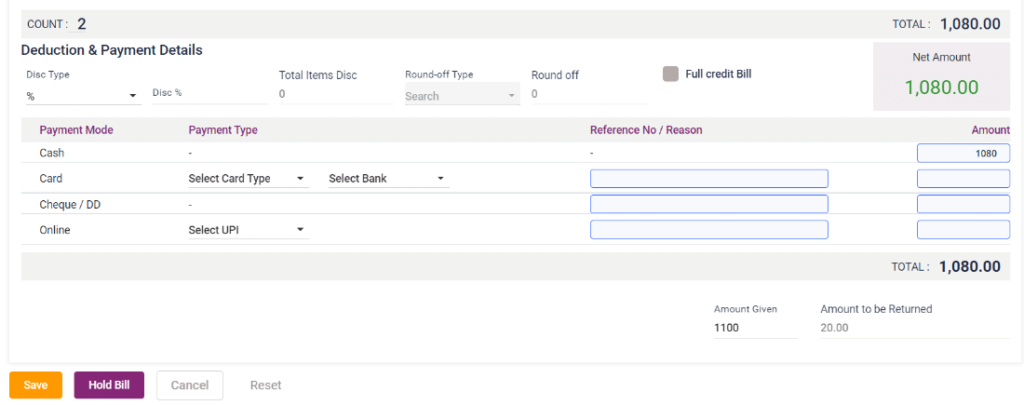
- Under the deduction and payment details, total discount for the final amount can be given. Select the discount type and enter the discount percent/ amount accordingly , the total amount will be calculated and displayed.
Full credit bill check box:
- If the payer wants to pay the bill through credit then this option has to be checked. After selecting this, the particular bill will be moved to the “Credit Bill” page in the “Accounts” section.
- Amount given and Amount to be returned: Enter the amount given by the payer, the “Amount to be returned” will be calculated and displayed in the field.
- Save: Click on the save button to pay the bill and the bill will be displayed in the “Pharmacy sales” page.
- Hold bill: Click on the hold bill button to pay the bill later or the payer couldn’t pay due to some other reasons. On clicking the hold bill option, the particular bill will be moved to the “Unbilled list” in the Sales dashboard.
- Sales Return: Click on the Sales return icon to return the items which has been sold.
11.20. Pharmacy sales- Add sales- add medicine section.

11.21. Pharmacy sales- Add sales- Payment section

11.22. Pharmacy- Pharmacy sales page

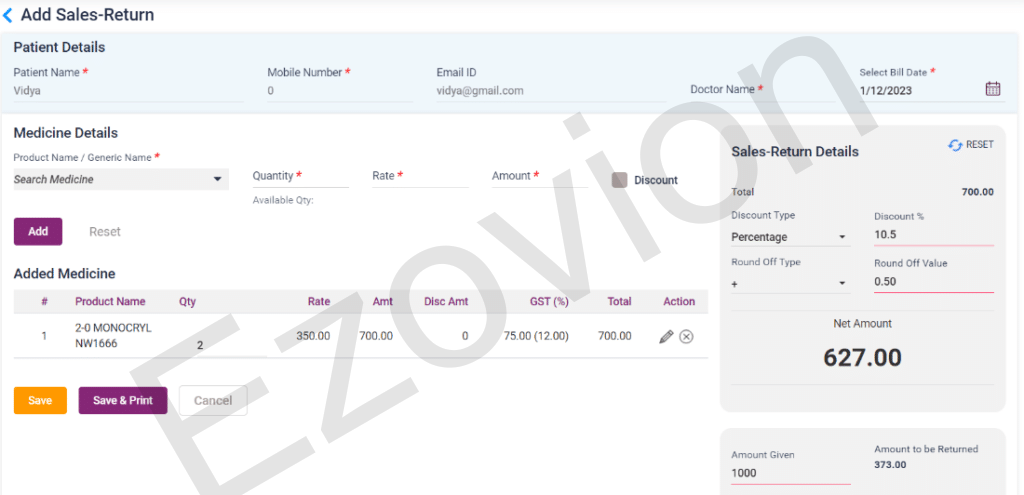
B. Sales Return: The pharmacy sales return page has the details of the items which has been returned by the buyer because of various reasons which include damaged medicines, expired medicines or any other reasons. In the Sales page, click on the sales return icon which leads to the “Add Sales Return” page. On clicking the sale return page, the “Patient details” section will be automatically loaded. The user must enter the following details,
- Product Name: Select the medicine which has to be returned from the list.
- Quantity: Enter the quantity which has to be returned.
- Add: Click on the add button to add the medicines to be returned in a list below.
- In the sales return details, check the discount check box to give a discount on the total amount. Click on the Round off check box to round off the amount to be paid.
- The added medicines can be edited and deleted by using the available icons.
- Amount given and Amount to be entered: Enter the amount given by the payer, the “Amount to be returned” will be calculated and displayed in the field.
- Save: Click on the save button to save the sales return bill.
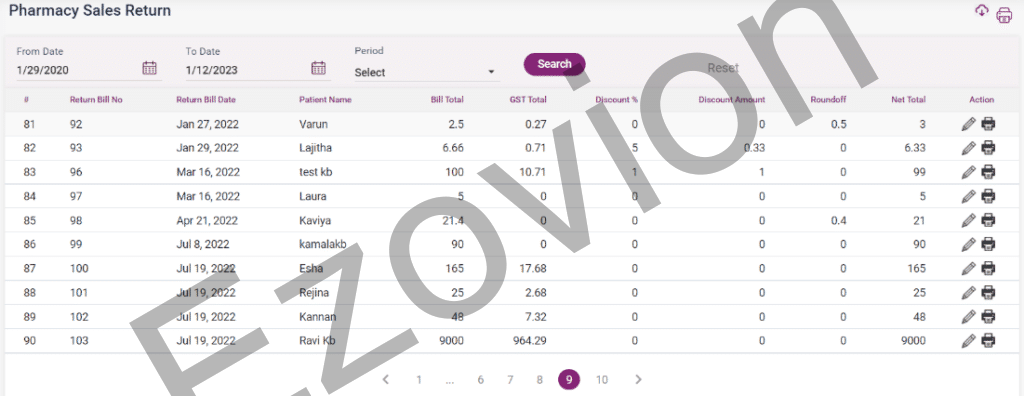
- The bills will be listed in the “Pharmacy sales return” page and can be searched using the given search criteria.
11.23 Pharmacy sales return – Add sales return- add medicine.
11.24. Pharmacy- Pharmacy sales return page
C. Sales Dashboard:
The sales dashboard of Ezovion HMS consists of the Revenue earned through sales, purchase and return. It has the pending bills from the EHR-Case Sheet-Prescription section of the patient. And also, the bills which are “Completed”, “Unbilled” and “Archived”.
- The dashboard section consists of the following details,
- Amount of Cash through Sales (No. of bills)
- Amount of cash returned.
- Amount of cash through receipt
- Amount of cash through purchase
- Amount of cash through purchase return
- Number of payments done
The pending bills section contains the bills which are prescribed by the physician in the EHR-Case sheet- Prescription section and is not paid.
- The number of bills will be displayed here. These bills can be archived or added as a new bill list.
- The pending bills can be searched using the search text box and the period drop down list.
- A new Sales can be added using the “+ Counter Sales” button which leads to the “Pharmacy Sales” page.
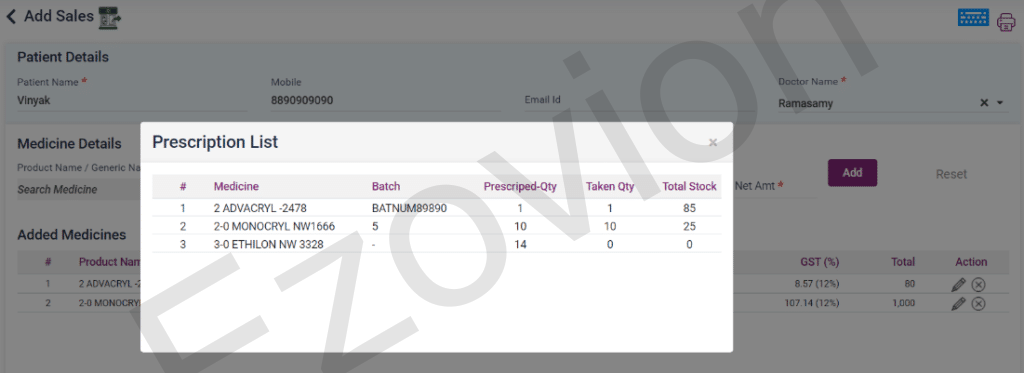
- On clicking the “New bill” option of the pending bill, it leads to the “Add Sales” page with the prescribed medicines in a pop up box. It shows the prescribed quantity, taken quantity and the total stock of the medicines in the prescribed list.
- After closing the pop up box, only the medicines which are available in stock will be added in the “Added Medicines” list.
- The added medicines can be edited or deleted using the icons available. The user can add more medicines from the list if the customer has bought any extra medicines.
- Then discount can be given in the discount section and followed by payment by the available various options.
- On clicking the save button the particular bill will be paid and listed in the “Pharmacy Sales” page. On clicking hold bill button the particular bill would be moved to the “Unbilled List” section of the Pharmacy Sales Dashboard.
11.25. Pharmacy- Sales dashboard

11.26. Pharmacy- Sales dashboard-Pending bills- new bill- Prescription list
11.27. Pharmacy- Sales dashboard-Pending bills- new bill- Add sales.

11.28. Pharmacy- Sales dashboard-Pending bills- New bill- Add sales- Payment section.
4. STOCK
Stock consists of all the medical resources such as equipment, medicines, and patient health data that are found in the Hospital. Ezovion HMS provides various options to add or view the stock data which includes,
- Stock List:
- The stock list consists of the details of the stock which includes the medicine name, expiry date, batch number, total no of stock, generic name (if specified), manufacturer, GST and sell price.
- On clicking edit icon of a particular medicine, “Stock Details” pop up box is displayed. It has two sections, stock adjustment and selling MRP.
- The user can mark the item as “zero quantity” if stock is not available for a particular medicine in the stock adjustment section and click save. Selling MRP of the particular medicine can be changed in this section.
- On purchase or sales of a medicine the stock list will get updated automatically.
11.29. Pharmacy- Stock List

- Expiry List:
- The expiry list consists of the stock which are nearing the expiry date.
- The expiry list search shows the details of medicine with expiry date in “The current month”, “Next 2 months”, “Next 3 months”, “Next 6 months”, “Next 1 year” and “more than a year”.
11.30. Pharmacy- Expiry List

3. Opening Stock:
- Opening Stock is the amount and value of materials that a company has available for sale or use at the beginning of an accounting period.
- The user can add opening stock by clicking in the “Add Opening Stock” button.
- On clicking, directs to the “Add Opening Stock details” page.
- Select the medicine name from the list, once selected the category, units and GST Total will be loaded automatically.
- Once the above mentioned details are entered, the net quantity, cost price per unit, sell price per unit and MRP price per unit will be calculated and displayed.
- Click on the Save button to add the medicine in the added stock list
11.31. Pharmacy- Opening Stock

4. Low Stock List
- The minimum stock alert list consists of the list of medicines which are nearly running out of stock.
- The low stock indicates the stock which is lower than the minimum quantity which is mentioned in the medicine master.
11.32. Pharmacy- Low Stock List

- Excess Stock List
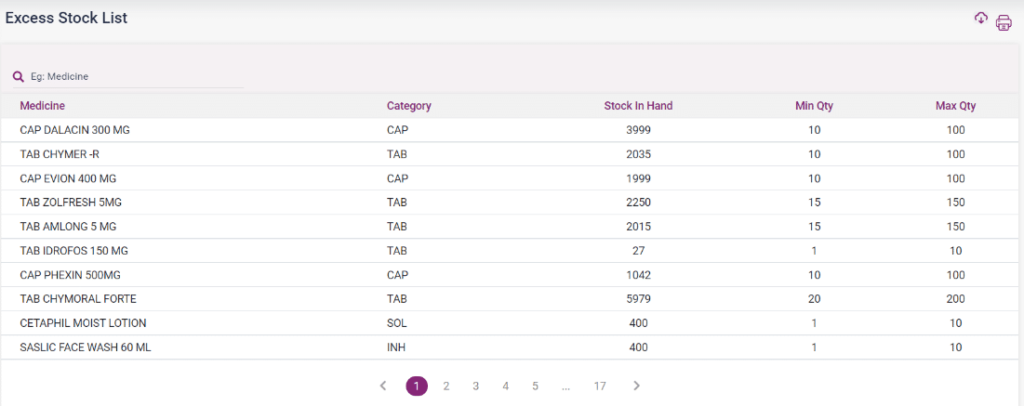
The excess stock list contains the list of medicines which are more than the maximum quantity of the medicine mentioned in the medicine master.
11.33 Pharmacy- Excess Stock List
4. ACCOUNTS
The accounts section consists of the revenue of the pharmacy department through sales and purchase. It consists of the following sections,
- Credit Bill:
- This page consists of the bills which were marked as “Full Credit Bill” for the patient’s payer.
- The credit bills sent from OP and pharmacy sales are shown in this list. These bills can be edited and paid from here.
- On clicking the edit icon, it leads to the “Add Payment” page.
- In the add payment page the details of the credit bill will be automatically loaded. The user has to enter the mode of payment and the amount which is paid.
- If there are many bills, few of the bills can be paid or all the bills can be paid at once as per the payer’s requirement.
- After selecting the Payment type and entering the amount click on the “Pay Now” button to complete the payment.
- After payment the bill gets removed from the “Credit bill” section and moves to the receipt list section.
11.34. Pharmacy- Accounts- Credit bill page

11.35. Pharmacy- Accounts- Credit bill payment page

- Receipt List:
- The credit bills which are paid will be displayed in the “Receipt List” page.
- The user can view the paid bills by clicking the “View” icon of a particular bill.
11.36. Pharmacy- Accounts- Receipt List
- Supplier dues:
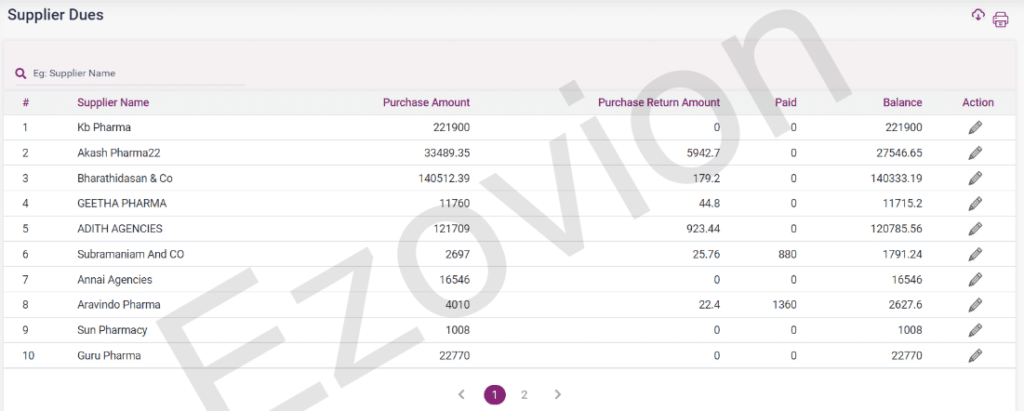
- The Supplier dues section consists of the pending payment list of the purchases which has been done by the hospital.
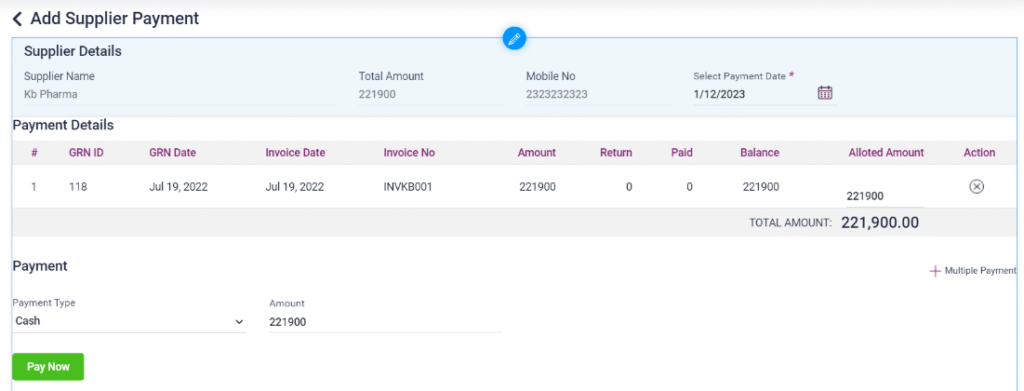
- Click on “Edit” option under Action, it directs to the “Add Supplier Payment” page.
- All the purchase done from this supplier will be displayed. The user can pay all the bill or any number of bills. If the user does not want to pay any one of the bills, then that particular bill can be deleted.
- The user has to enter the mode of payment and the amount which is paid.
- After selecting the Payment type and entering the amount click on the “Pay Now” button to complete the payment.
- After payment the bill will be removed from the “Supplier dues” page and moved to the “Supplier Payment List”.
11.37. Pharmacy- Accounts- Supplier Dues page

11.38. Pharmacy- Accounts- Supplier Payment page
- Supplier Payment list
- The supplier payment list page consists of all the payments done for the day.
- The older payments can be searched using the “From Date”, “To Date” and “Period”.
- Each of the payment done can be viewed using the “View” icon under Action.
11.39. Pharmacy- Supplier Payment list page

11.40. Pharmacy- Supplier Payment View page


