6.IP (In-Patient) #
After the patient is admitted, the patient will be provided with a variety of services available in the hospital in a systematical manner. The Inpatient (IP) module consists of the following,
- Admission List
- Discharged List
- Inpatient Cancelled List
Admission List #
- The admission list consists of the patients who are admitted to the hospital.
- The admitted patients can be searched in this page by the “Reg ID”, “Mobile Number”, “Search” text field and from and to date.
- The details displayed are serial number, admission number, registration number, patient name, age, gender, physician, ward and status.
- There are various options available under Action. They are,
- View/Edit
- Advance
- Services
- Nurse Notes
- Doctor Notes
- New Discharge Summary
- Operation Theater Booking
- View/Edit: On clicking the View/Edit option, it directs to the admission booking page where the user can edit the details of the patient entered.
- Advance: On clicking the Advance option, it directs to the add advance page where the user can add an advance amount paid for the patient by the payer.
- Services: On clicking Services option, the Inpatient Services screen will be displayed. The prescribed services for the patient can be added here.
- Nurse Notes: On clicking the Nurse Notes option the screen to enter the vitals and other details by the nurse will be displayed.
- Doctor Notes: Upon clicking the doctor notes option the screen to enter the doctor notes prescription and examination details will be displayed.
- IP Billing: Upon selecting the Inpatient billing options the Inpatient Billing screen will be displayed. It consists of the services added for the patient along with the amount for the services. The bills can be paid from here.
- New Discharge Summary: The screen to select and enter the discharge summary details will be shown on selecting this option.
- Operation Theater Booking: On selecting Operation Theater (OT) Booking option, the user can add Operation Theater (OT) Services for the patient in the Operation Theater (OT) booking screen which will be displayed.
Screenshot: #
6.A.1 Admission List #
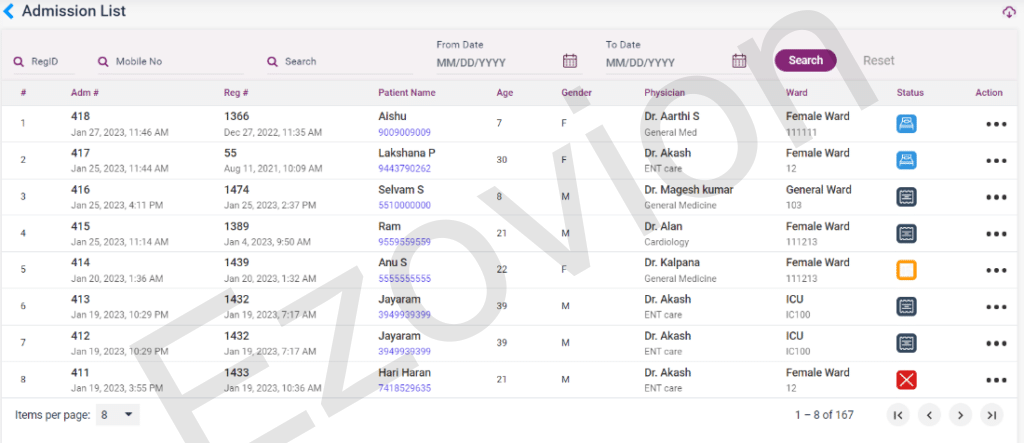
The above-mentioned are the options available from the admission list. There is a workflow for the Inpatient service. The workflow diagram is given below followed by the details of the process and the pages.
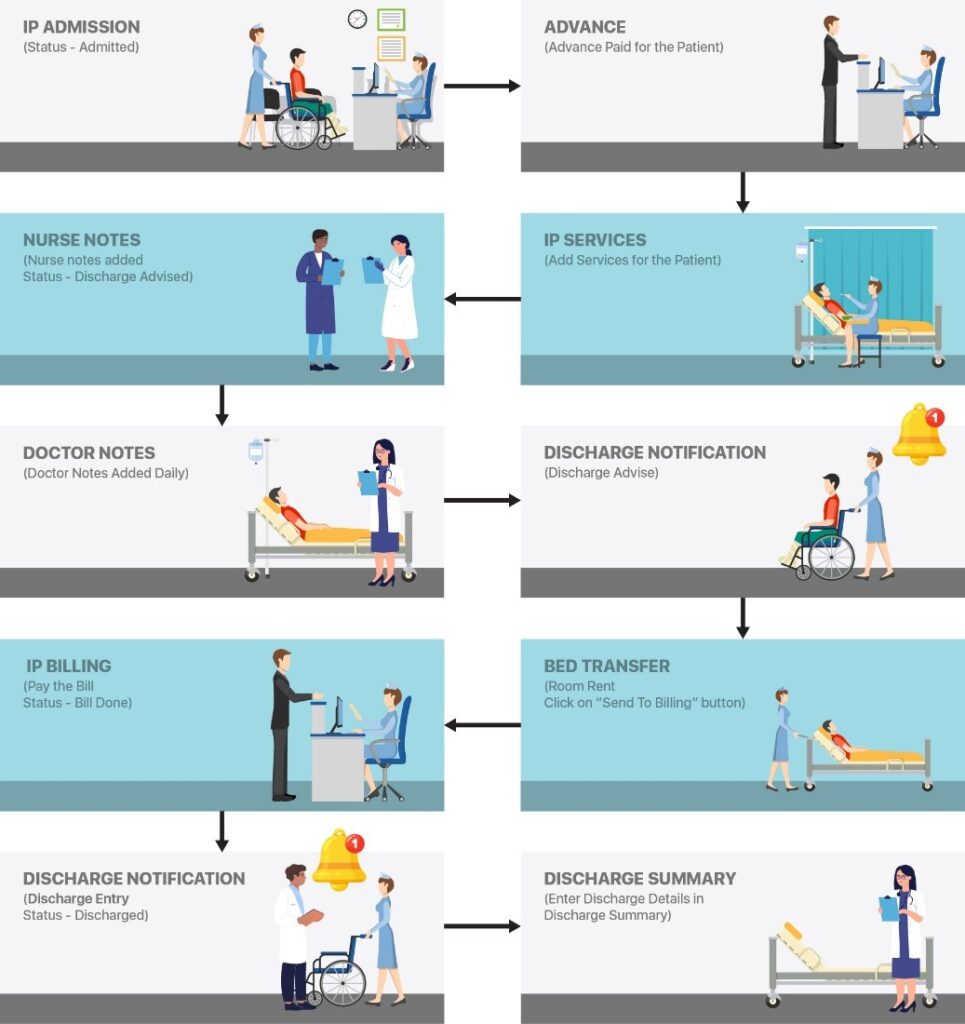
The Inpatient flow must be followed in the respective orders. It starts from the admission to the discharge of the patient.
- Admission Summary
- Advance
- IP Services
- Nurse Notes
- Doctor Notes
- Discharge Notification
- Bed Transfer
- IP Billing
- Discharge Summary
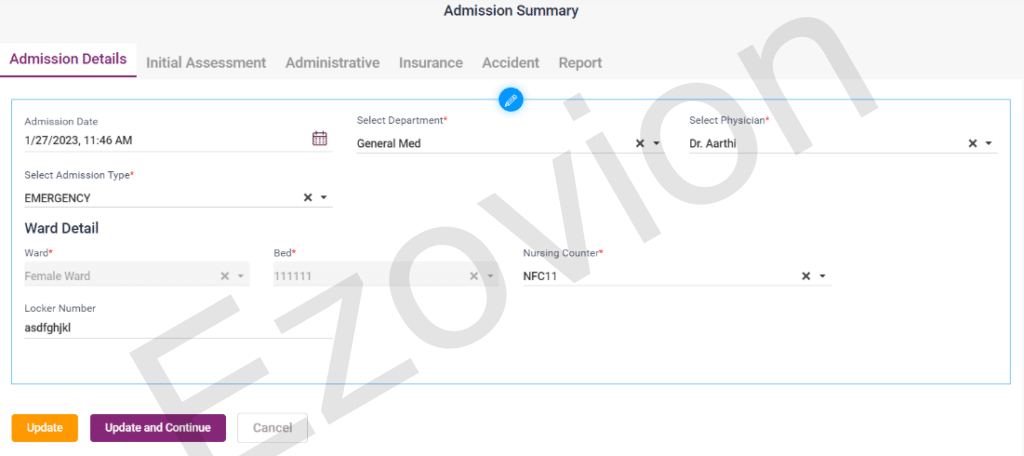
- Admission Summary: The admission summary consists of the admission details, Initial Assessment, Administrative, Insurance and other details entered for the admission of the patient.
6.A.2 – Admission Summary #
2. Advance: On clicking the Advance option, it directs to the add advance page where the user can add an advance amount paid for the patient by the payer. The advance details will be also loaded in the “Advance List” under the InPatient Billing module.
- Click on the “Add Advance” button for the add advance screen.
- The advance paying date and time will be displayed automatically.
- The user will enter the amount paid by the payer in the amount field according to the payment mode.
- The payment modes include “cash”, “card”, “cheque”, “online banking” and “net banking”.
- The user must select the type of payment, enter the reference number and click on the “Save” button to save the advance.
- Click on “Cancel” to cancel the payment and the “Reset” button to clear the entered details.
- The details given will be displayed on the advance receipt screen.
6.A.3 – Inpatient Admission- Add Advance page #

6.A.4 – Inpatient Advance screen #

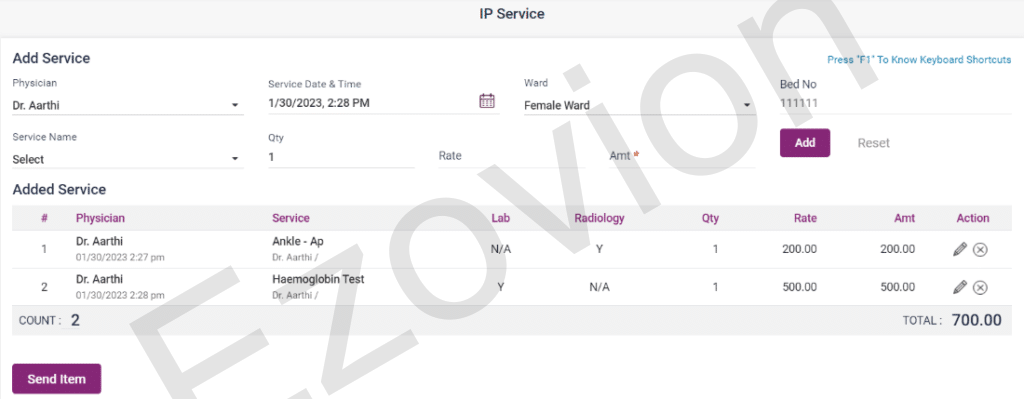
- Inpatient Service: On clicking the Services option, the IP Services screen will be displayed. The prescribed services for the patient can be added here.
- The physician, service added date and time, ward and bed number will be automatically displayed.
- Add the service by selecting from the “Service name” drop-down list.
- The added services will be displayed in a list below. After adding the necessary services click on the “Send Item” button to send the services to the respective departments i.e., the lab services will be sent to the lab order queue and the radiology services will be sent to the Radiology department.
6. A. 5 – Inpatient Services #
Nurse Notes:
Upon clicking nurse notes, the nurse notes screen will be displayed. The nurse notes consist of 4 sections. They are,
#
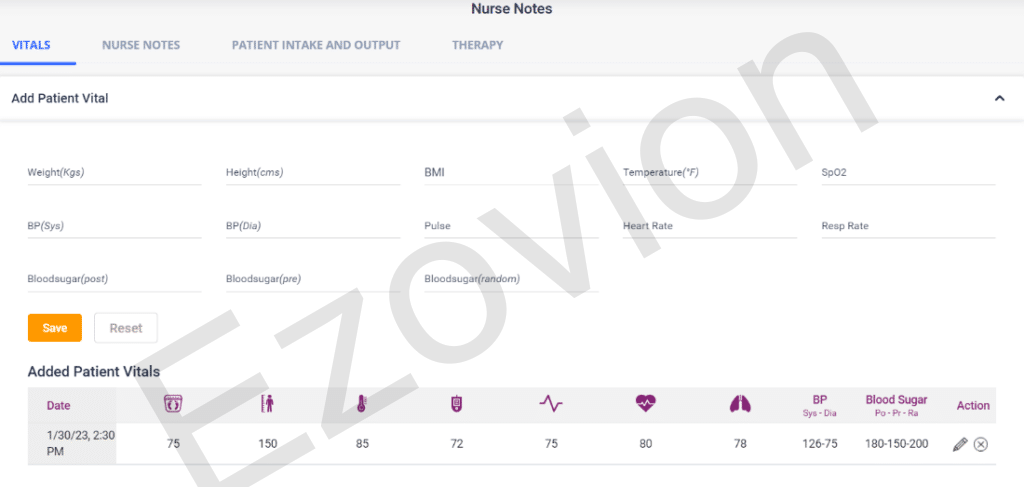
- Vitals: The details given under vitals must be entered by the nurse. By clicking the Save button after entering the details get saved in a list below with the date and time. The entered details can be edited and deleted by using the action icons present.
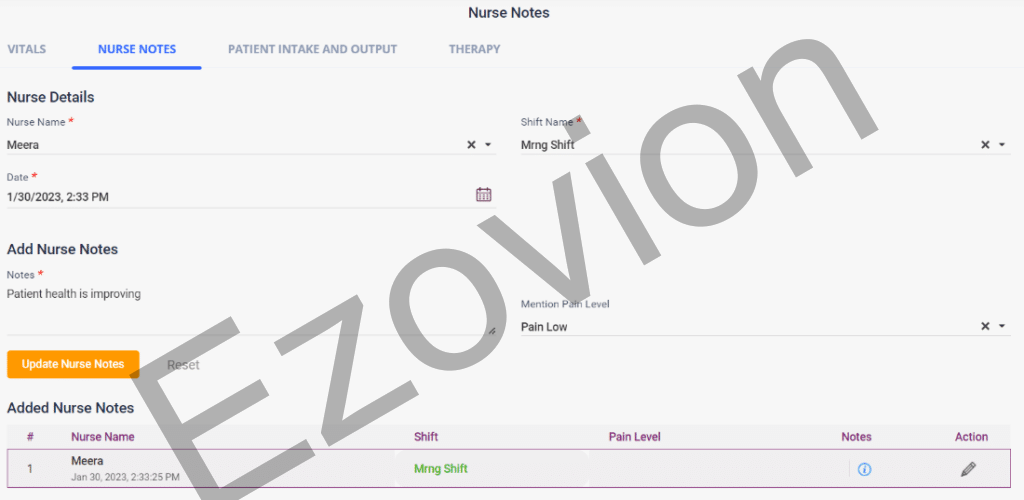
- Nurse Notes: In the nurse notes section, select the Nurse name, shift name, date and time will be displayed. In the Add, nurse notes section, enter any notes if needed, select the pain level, and click on the “Add Nurse Notes” button. The added nurse notes will be shown in the list below. It can be edited using the edit icon present. Click on Reset to delete the entered details.
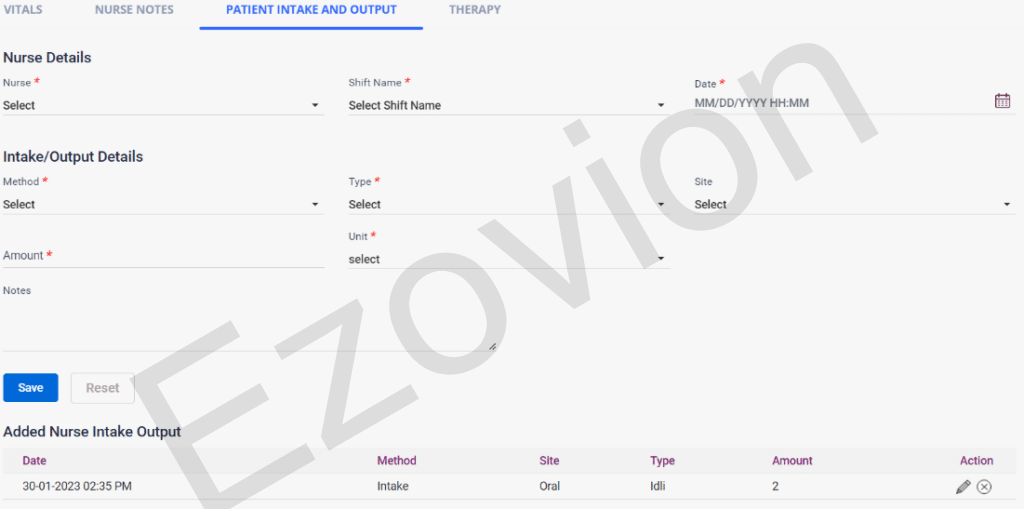
- Patient Intake and Output: In this section, the nurse’s details and food intake details of the patient will be entered. Select the Nurse name, shift name, date and time will be displayed. Select the following details, Method, Type, Site, Amount, Unit, and Notes. After that click on the “Save” button to add the entered details to the list below. The added details will be shown in the list below. It can be edited or deleted using the icons present. Click on Reset to delete the entered details.
- Therapy: The user can add the details of the therapy given to the patient by the doctor in this section. Select the Physician and description, enter the improvement marks and notes, date and time will be displayed. After that click on the “Add Therapy” button to add the entered details to the list below. The added details will be shown in the list below. It can be edited or deleted using the icons present. Click on Reset to delete the entered details.
6.A.6 – Nurse notes- Vitals #
6.A.7 -Nurse Notes- Nurse notes #
6.A.8 – Nurse notes- Intake and Output #
6.A.9 – Nurse Notes- Therapy #

- Doctor Notes: Upon clicking nurse notes, the nurse notes screen will be displayed. The nurse notes consist of sections. They are,
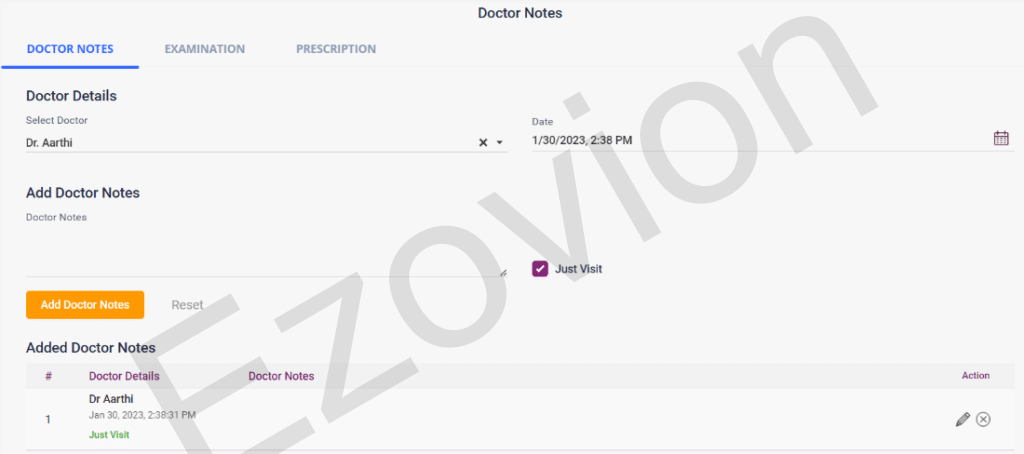
- Doctor Notes: In this page, the doctor’s name, current date and time will be displayed, enter notes if needed. Click on the “just visit” check box if the doctor has come only for a general visit. After that, click on the “Add Doctor Notes” button. The added details will be shown in the list below. It can be edited or deleted using the icons present. Click on Reset to delete the entered details.
- Examination: On this page, the doctor’s name, current date and time will be displayed, select the examination from the drop-down list, and enter notes if needed. After that, click on the “Add Examination” button. The added details will be shown in the list below. It can be edited or deleted using the icons present. Click on Reset to delete the entered details.
- Prescription: The doctor’s prescribed medicines for the patient can be uploaded in this section.
The following fields need to be filled in, #
- Favorite: The medicines added to the favorite list will be shown here. The user can select any of their required medicines if needed.
- Medicine: If the frequently used medicines in the favorite list are not needed, then the user can select the prescribed medicines from the medicine name list.
- Days: Select the number of days the medicine has been prescribed.
- Start Date: Select the start date of the medicine.
- Stop Date: Select the end date of the medicine.
- Timing: Select the timing of when the medicine should be taken.
- To be taken: Select when the medicine should be taken whether after food, before food or with food.
- Quantity: The number of medicines needed will be displayed automatically.
- Prescribed When: Select when the medicine has been prescribed from the drop-down list.
- Instructions: Enter instructions if any.
- Click on the “Add Medicine” button to add the entered medicine in the prescription list below. Click on Reset to delete the entered details.
- In the added medicine list, click on the “Add as Favorite” icon. On clicking, the Add as Favorite Medicine pop-up box will be shown. Enter a name for the medicine list and select the “Save” button to add the medicines to the favorite list. Click on Cancel to cancel the entry.
- Click on the “Delete All” icon to delete the added medicines.
- Click on the “Send to Pharmacy” icon to send the medicines to the sales dashboard section of the pharmacy module.
- The added medicines can be edited and deleted individually by using the icons present in the list.
6.A.10 – Doctor notes #
6.A.11 – Doctor Notes – Examination #

6.A.12- Doctor notes- Prescription #

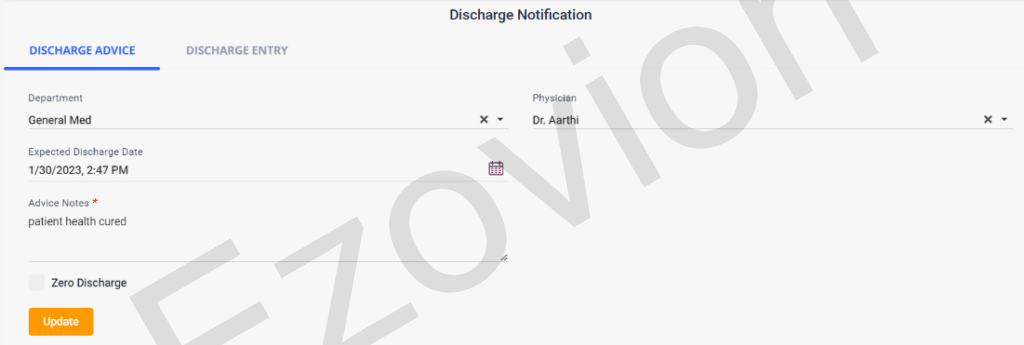
6. Discharge Notification- Discharge Advise #
- If the patient is cured or needs to be discharged for various reasons, the doctor will advise to discharge the patient. On this page, it can be done.
- The department of the physician and the physician’s name will be displayed. Select the Expected discharge date given by the doctor.
- Enter advice notes for the patient given by the doctor.
- Click on the “Save” button to save the discharge advice. After this, the status of the patient will be changed to “Discharge Advised”.
- Select the “Cancel” check box to cancel the discharge and admit the patient again (This is done only in very emergency situations). By selecting this cancel option, the status of the patient will be changed to “Admitted”. If the discharge is advised again, then this cancel checkbox can be unchecked.
- Zero Discharge: This option can be checked if there is a sudden demise of the patient in the hospital premises right after admission. Since no services were provided to the patient, this option is used to discharge the patient free of charge. After checking this option, enter the reason and select the physician or employee who has approved it and click on the “Save” button. The status will be set to “Cancelled”.
6.A.13 – Discharge Notification- Discharge Advice #
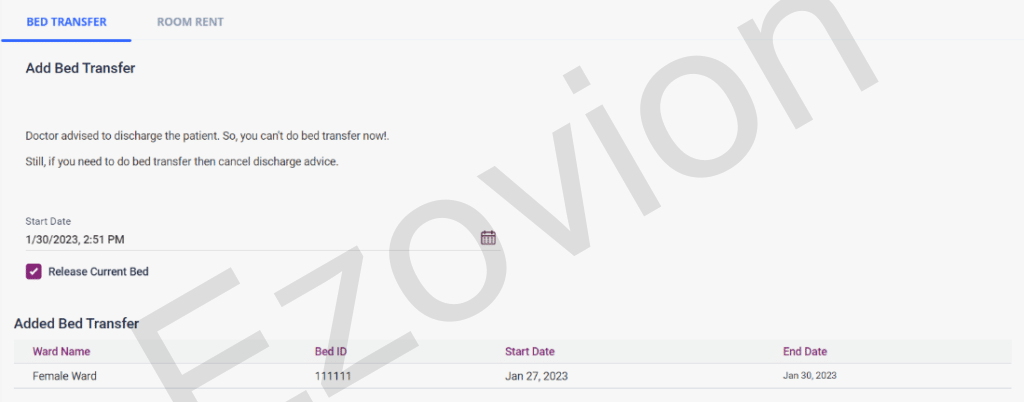
- 1) Bed Transfer:
- If the patient has been transferred from one bed to another bed for several reasons that can be updated on this page.
- Select a bed from any one of the wards shown. Select the start date, check the “Release current bed” check box and click on Save. The details will be saved in a list below.
6.A. 14-Bed Transfer #
2) Room Rent
- If a patient’s discharge has been advised by the physician, then the patient cannot be transferred to another bed.
- After discharge advice the current bed will be released and updated automatically in the list.
- Only after that the “Send to Billing” button will be available under the “Room Rent” section.
- The date of entry in the room, the date of exit from the room and the rent of the room will be displayed.
- On selecting the “Send to Billing” button the room rent will be sent to the IP Services and the IP Billing sections.
6.A.15 – Bed Transfer –Room Rent #

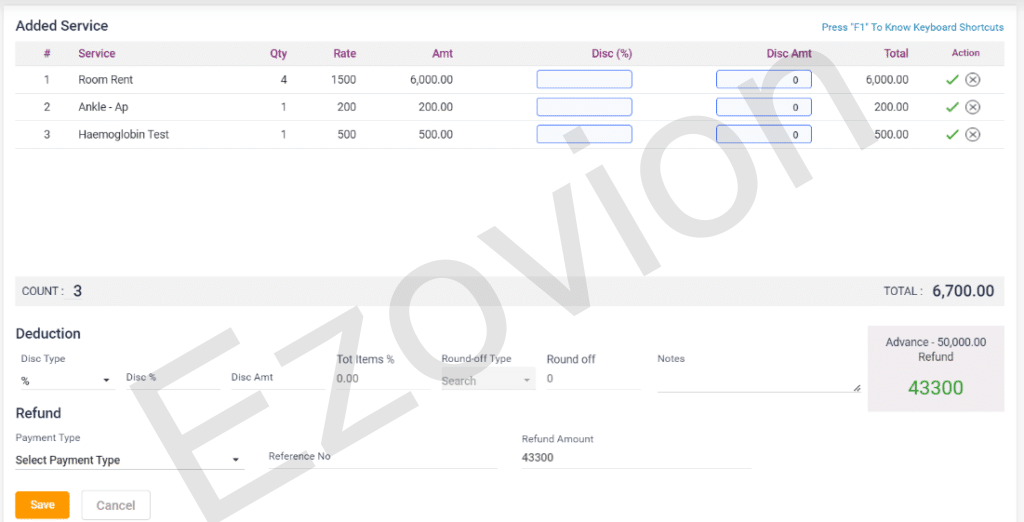
VIII) IP Billing: In this section, the bill for the IP services done for the patient will be shown in a list with the amount details. The bills can be paid on this page.
- For each service a discount can be given in percentage or amount. If percent Is given as a discount, then the amount will be calculated and displayed in the amount field. If the amount is given as a discount, then the amount will be decreased from the total amount.
- After giving a discount, click on the tick icon to update the discount amount.
- Click on the delete icon to delete the added bill for the service.
- The count and the total amount to be paid will be displayed.
- A total discount for the bill can be given in the deduction section.
The amount can be paid through the following options: #
- Cash: If the payer pays the bill with cash, the amount must be entered here.
- Card: When the payer selects a card payment, the card type must be selected with the reference number and the amount must be entered.
- Online: When the payer pays the bill through online payment, then select the UPI type, and enter the reference number and the amount.
- Credit: If the payer wants to pay the bill later for various reasons, then the amount can be entered in the credit option. This bill will be moved to the Credit bill- Self of the Accounts module.
- Insurance/Corporate: When the payer has insurance or corporate to pay the bill, select the payer, and enter the reference number and amount.
- Wallet: If the payer wants to pay the bill with the available wallet balance of the patient, then the amount can be entered here.
- Net Banking- When the payer pays the bill through net banking, then select the bank, and enter the reference number and amount.
- The total amount can be paid with multiple options also.
- Save: Click on the save button to pay the bill. After payment, the bill will be shown in the “IP Bill list” in the IP Billing section of the menu
- Hold Bill: On clicking the “Hold Bill” option, the particular IP Bill will be moved to the “IP Hold Bill List” in the IP Billing section of the menu.
- Preview: On clicking preview, the preview of the IP bill will be displayed.
- Cancel: Click on the cancel button to cancel the payment and go to the previous page.
- Reset: Click on the reset button to clear the entered amount details.
- After the payment of the IP Bill, the status of the patient in IP will change to “Bill Done”.
6.A.16 – Inpatient Billing #
VI) Discharge Notification- Discharge Entry
- After the discharge advice and bill are paid, the discharge entry page must be filled in.
- Select the reason for discharge, the discharge planned date and the actual discharge date will be displayed. The actual discharge date can be changed.
- Click on the “Discharge acceptance from respective department” check box.
- After that, click on the “Save” button to complete the discharge of the patient. The status of the patient will be changed to “Discharged”.
6.A.17 – Discharge Notification- Discharge Entry #

IX) Discharge Summary: After the discharge of the patient, the discharge summary of the patient will be loaded from this page.
- Select the discharge summary from the list and enter the necessary details in the form.
- Click on the “Save” button to save the summary. After saving click on Edit summary to edit the summary, cancel summary to delete the summary.
- Click on the “Preview” button to preview the discharge summary.
- Click on “Print” to print the discharge summary of the patient.
- Discharge List
- The discharge list consists of the list of patients who have been discharged after admission and services.
- The discharged patient details can be searched by reg ID, Mobile number, form and to date, search field and discharge reason.
- The details displayed are admission number, discharge reason, registration number, patient name, age, gender, ward, status and action.
- In the action icons, the user can view the following details of the patient,
6.B.1 – Discharged List #

- IP Cancelled List
- If an admission of patient has been cancelled, then that patient details will be displayed in the IP Admission Cancelled list.
- The details displayed are Admission details, discharge details, register number, patient details, age, gender, physician details, ward, bed and status.
- From the action icons the user can print the details or edit the admission details.


